

How to Enable or Disable Memory Compression in Windows 11/10
Memory is an of import factor in processing dissimilar tasks faster. Since it is electronic memory, it is costly and most people cannot afford a huge amount of RAM. Also, in that location is a limit on RAM that the operating systems can support. Only the Retentivity Compression characteristic in Windows 11 and Windows 10 makes certain that y'all are getting optimal and balanced usage of RAM along with the folio file. The new Os comes with retentivity optimization that incorporates compression of data occupying the electronic memory. The article talks about how older Windows versions managed memory, what is the retentiveness pinch feature and how Memory Compression works in Windows 11/10.
Retention Management in older Windows versions
In Windows, the whole memory thing is divided into 3 distinct parts:
- Random Access Memory (Electronic Memory)
- Pagefile (Extension of RAM on Hard Disk)
- Hard Deejay and other types of storage systems
In the older versions, it was necessary to allow a adept amount of hard disk space to pagefile.sys that acted as an extension of the electronic memory. Retentivity management in older versions of Windows was simple and direct. Store the currently running applications and related data to electronic memory and send the least used data to pagefile.sys. While the traditional application resided in the main memory, the data part was often pushed to pagefile if information technology is not used for long. If the chapters of pagefile was exceeded, the data on pagefile was replaced. In that case, if the awarding – that was however in the electronic retention – required old data, it was once again to be loaded into the RAM from the difficult disk or other storage devices – which means it took more fourth dimension to read or write information.
In other words, applications and nearly recent data are to reside in RAM, frequently used information past current applications stayed in pagefile.sys and the hard disk was accessed when a new prepare of data had to be read or written. This includes data not present on pagefile – the data that may accept been replaced with a new set.
Retentiveness Management in Windows 11/10 – The App Pagefiles
With Windows 11/10, retentivity management changed a little. There were ii types of applications in Windows 8/viii.1. The traditional applications still worked equally explained to a higher place. Part of them stayed in RAM while the required data was stored to pagefile when the applications were idle and when the RAM was full.
The modernistic apps ran merely when they were in focus. If yous opened app A and app B and are currently working on app A, app B along with related data would exist pushed back to the pagefile. That manner, app A tin can accept practiced access to retentivity and need non reach out to pagefile for every fetch process. When you sent app A to the background by focusing on app B, app A and related information would go to pagefile while app B gets sectional access to RAM.
This method saved on memory and fabricated apps faster. With Windows 11/10, the compression feature was added to brand it even faster. The following section explains how it works in Windows 10.
Retentivity Management in Windows 11/10 – Pinch over Pagefile
The memory direction is the same as that of Windows 8/8.ane. The traditional apps are stored in electronic memory and focused apps are also stored in RAM. If RAM becomes congested due to excess data, the app and information things are compressed upwardly to 40% and accommodated in the same electronic memory.
Windows 11/10 besides uses pagefile.sys to shop information of the electric retentivity. If an app is using too much data but at slower intervals, some of its data is pushed to pagefile if electronic memory is short of free space. If the app becomes ambitious, the data is moved back from pagefile to the electronic retentivity and some other app is pushed to pagefile to make space for the electric current app. Only in rare cases, the hard deejay is approached: when a new set of data or app is to be loaded or when the data required by an app is non nowadays on either RAM or pagefile.
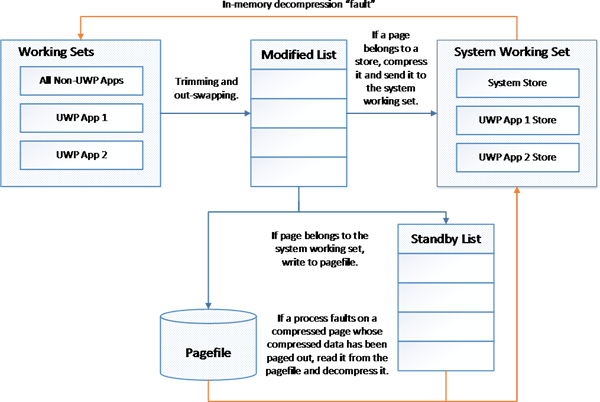
Memory Compression in Windows 11/10 optimizes RAM usage
Windows eleven/ten as well has two categories of apps: UWP and Traditional. The traditional applications are stored separately in electronic memory while the modernistic apps each have their ain stack. This makes it easier to button mod apps and related data to pagefile when y'all open likewise many apps in a way that memory falls short despite compression.
It saves most 50% of pagefile action (compared to older versions of Windows) when yous are using the memory compression characteristic in Windows because most of the data is already available on the main memory – in a compressed form. When the app or data is required, it is decompressed and used. So there is the demand to keep a portion of RAM empty to provide for uncompressed data.
Even when using pagefile, the speed is faster in Windows xi/ten because the entire app and related information are stored as a compressed page which is accessed in sequential order. While office of the information is being uncompressed, the other role is sent to the main retentiveness for processing. This as well saves time and makes computing faster on Windows xi/10 machines.
How to check if Retentiveness Compression is enabled in Windows?
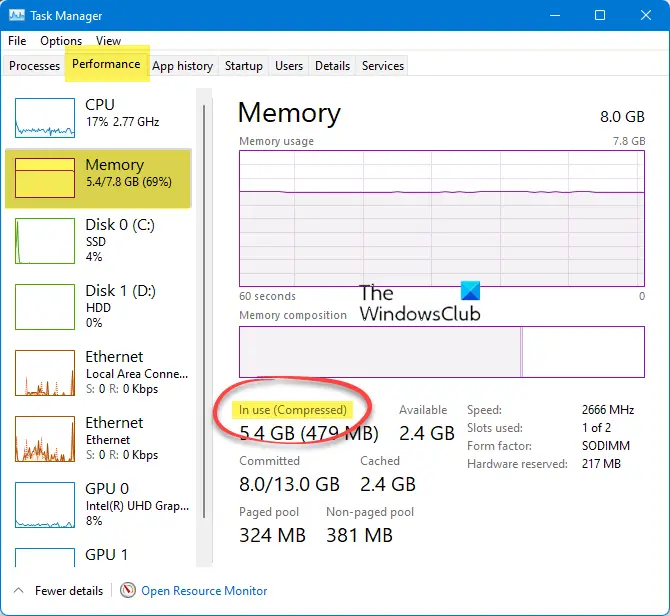
The simplest way to check if Retentivity Compression is enabled or disabled is:
- Open the Task Director
- Select the Functioning tab on the top
- Click on Memory on the left side
- There in the correct console you will see In employ (Compressed)
- This indicated that Retention Pinch is enabled on your PC.
How to Enable or Disable Retentiveness Compression in Windows 11/10

Open up an elevated PowerShell window.
To check if retentiveness Compression is enabled or disabled, execute the following command:
Get-MMAgent
If y'all meet truthful against retentiveness compression, it means that information technology is enabled. If you run into imitation, it means that it is disabled.
Execute the following command to disable Memory Compression:
Disable-MMAgent -mc
Execute the post-obit control to enable Memory Compression:
Enable-MMAgent –mc
Promise this helps.
Now read: System Compression in Windows and how it saves space on devices.

Source: https://www.thewindowsclub.com/memory-compression-in-windows-10
Posted by: torressaking.blogspot.com
0 Response to "How to Enable or Disable Memory Compression in Windows 11/10"
Post a Comment